# How to use Level EDITOR

## Level Editor's Interface

<mark style="color:red;">**ATTENTION!**</mark> *Please, use **scenes** --->**Assets** /  **Scenes** / game when you create and edit your levels!*

<figure><img src="https://content.gitbook.com/content/LNeby0blIfkQdSTkoQBE/blobs/D5sxN1NjlE8zs3lSb0Hj/image.png" alt=""><figcaption></figcaption></figure>

<figure><img src="https://content.gitbook.com/content/LNeby0blIfkQdSTkoQBE/blobs/wlFqEQGf2vtlhW0hCZ0U/image.png" alt=""><figcaption></figcaption></figure>

1. <mark style="color:green;">**Editor section**</mark>. Here you can **create** your levels.
2. <mark style="color:green;">**Test level.**</mark> Use this button after creating a level if you want to test.
3. <mark style="color:green;">**Levels.**</mark> Enter a number of levels for creating or editing.\
   \
   **To switch** between the levels, use the buttons "**Previous level**" or "**Next level**" or enter a number of levels by hand.

<mark style="color:red;">**ATTENTION!**</mark> *You don't need to worry about saving data.All actions are automatically saved!*

4. <mark style="color:green;">**New level.**</mark> To create a new level press the "New level" button. The level is automatically created. You just need to create a level design.
5. <mark style="color:green;">**Rows**</mark> - number of the rows on game field. Maximum 11.
6. <mark style="color:green;">**Columns**</mark> - number of the columns on game field. Maximum 9.
7. <mark style="color:green;">**Limit**</mark> - you need choose the gameplay for your level. The Engine included two type of game play - Moves or Time. The drop-down menu select the type of gameplay:

![3.PNG](https://static.wixstatic.com/media/d59ada_2a7f1c3cc719459a9c9ec2a0a1dc546e~mv2.png/v1/fill/w_203,h_87,al_c,lg_1,q_85,enc_auto/3_PNG.png)

<mark style="color:red;">**\***</mark>*If you choose MOVES, you need to enter a limit on the number of moves for this level*

![4.PNG](https://static.wixstatic.com/media/d59ada_1407fb0610e2449fb2139fd39f89755a~mv2.png/v1/fill/w_203,h_30,al_c,q_85,usm_0.66_1.00_0.01,enc_auto/4_PNG.png)

<mark style="color:red;">**\***</mark>*If you choose TIME, you need to enter a limit on the number of minutes and seconds for this level*

![5.PNG](https://static.wixstatic.com/media/d59ada_cd0176c20dde4d6ebe0ea6fa14f23a98~mv2.png/v1/fill/w_203,h_30,al_c,q_85,usm_0.66_1.00_0.01,enc_auto/5_PNG.png)

8. <mark style="color:green;">**Color limit**</mark> - number of color on current level (minimum 3 - maximum 6)
9. <mark style="color:green;">**Stars**</mark> - number of scores for each stars (Star1 - minimum scores for win)

![6.PNG](https://static.wixstatic.com/media/d59ada_0cff882e75c74d60bcd910061dae0bec~mv2.png/v1/fill/w_264,h_74,al_c,q_85,usm_0.66_1.00_0.01,enc_auto/6_PNG.png)

10. &#x20;<mark style="color:green;">**Target**</mark> - you need to choose the target for your level. This editor included 4 versions of targets:\
    \ <mark style="color:yellow;">**SCORE**</mark> - get necessary number of scores and get one star\ <mark style="color:yellow;">**COLLECT**</mark> - get necessary number of items\ <mark style="color:yellow;">**INGREDIENTS**</mark> - get the necessary number of ingredients.\ <mark style="color:yellow;">**BLOCKS**</mark> - when you choose this target, additional blocks are available. This block is the target. Players need to destroy all the same blocks to win.

![7.PNG](https://static.wixstatic.com/media/d59ada_807d8175763646b6922cf4d3962ba9d8~mv2.png/v1/fill/w_193,h_137,al_c,lg_1,q_85,enc_auto/7_PNG.png)

<mark style="color:red;">**NOTE:**</mark>\
\&#xNAN;*If you select the limit for color of items, you can't choose some items. For example, if you select to limit 5 items, you can't choose "item 6" in settings.*

<figure><img src="https://static.wixstatic.com/media/d59ada_57d92798d77d4a33a8ba5c240764ca41~mv2.png/v1/fill/w_260,h_234,al_c,q_85,enc_auto/8_PNG.png" alt=""><figcaption></figcaption></figure>

<mark style="color:red;">**ATTENTION!**</mark>\
\&#xNAN;*Double-clicking creates a double layer of this block when you create or edit your level.*

<figure><img src="https://static.wixstatic.com/media/d59ada_8164c78d8bcc4b2fb9cc65d171ef3b98~mv2.png/v1/fill/w_378,h_230,al_c,lg_1,q_85,enc_auto/9_PNG.png" alt=""><figcaption></figcaption></figure>

**Empty** - use for clearing space.

**None** - use for cut a slot.\
&#x20;

11. <mark style="color:green;">**Tools.**</mark> Press button "Clear" to reset your settings.
12. <mark style="color:green;">**Blocks .**</mark> It is obstacles. Click on the icon on any block and click on the game field.&#x20;
13. <mark style="color:green;">**Game field.**</mark> Place for actions in game. You need to click on the wisher block then click on the game field, and the block appears in a specified place.

## Settings tab

<mark style="color:red;">**ATTENTION!**</mark>\
\&#xNAN;*Please, use scenes --->Assets /  Scenes / game.unity when setting up the game!*
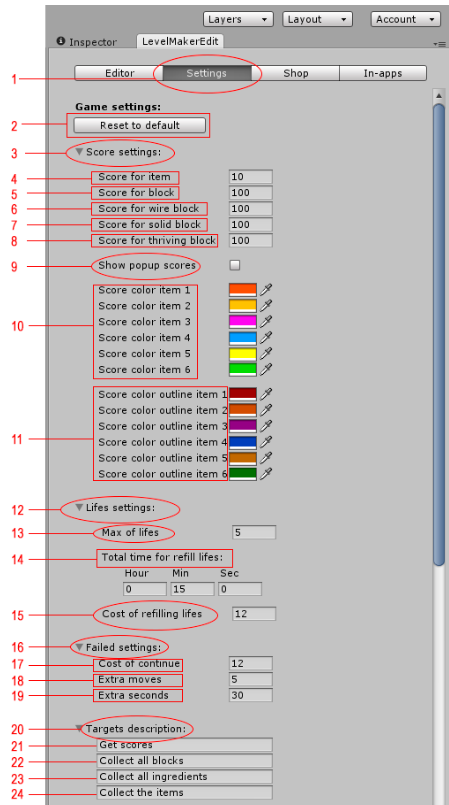
<figure><img src="https://static.wixstatic.com/media/d59ada_ab372cd2eeda40ec9d0bd9e4f86ac884~mv2.png/v1/fill/w_449,h_805,al_c,q_90,enc_auto/10_PNG.png" alt=""><figcaption></figcaption></figure>

1. <mark style="color:green;">**Settings**</mark> - you can setting up your project here;
2. <mark style="color:green;">**Reset to default**</mark> - reset all your setting;
3. <mark style="color:green;">**Score settings**</mark> - all settings about score;
4. <mark style="color:green;">**Score for ITEMS**</mark> - you can change a score for destroying game ITEMS (all jelly, stripes jelly and packages);
5. <mark style="color:green;">**Score for BLOCK**</mark> - you can change a score for destroying game obstacles - BLOCK / DOUBLE BLOCK&#x20;
6. &#x20;<mark style="color:green;">**Score for WIRE BLOCK-**</mark> you can change a score for destroying game obstacles - WIRE BLOCK
7. &#x20;<mark style="color:green;">**Score for SOLID BLOCK**</mark>- you can change a score for destroying game obstacles - SOLID BLOCK
8. <mark style="color:green;">**Score for THRIVING BLOCK**</mark> - you can change a score for destroying game obstacles - THRIVING BLOCK
9. <mark style="color:green;">**Show POPUP score**</mark> - if you want to show popup score, you need check it

![11.PNG](https://static.wixstatic.com/media/d59ada_ed11b5b6cc0246138ae55e65f1f03611~mv2.png/v1/fill/w_220,h_41,al_c,q_85,enc_auto/11_PNG.png)![12.PNG](https://static.wixstatic.com/media/d59ada_0c27683cf0764622be81c5e93703826e~mv2.png/v1/fill/w_186,h_121,al_c,lg_1,q_85,enc_auto/12_PNG.png)

10. <mark style="color:green;">**Score color item**</mark>- you can change the color for each score of the items. You need just to click on color field and select a new color in the window "Color" like on Screenshot:

<figure><img src="https://static.wixstatic.com/media/d59ada_563fcaaed79c4934b0bb8d7deed26b7c~mv2.png/v1/fill/w_482,h_441,al_c,q_85,enc_auto/13_PNG.png" alt=""><figcaption></figcaption></figure>

11. <mark style="color:green;">**Score color outline item**</mark>- the same like "Score color item"
12. <mark style="color:green;">**Life settings**</mark> - all settings of life.&#x20;
13. <mark style="color:green;">**Max of life**</mark> - maximum number of life. Five lives by default.  But you can change it like you wish, just change this number:

<figure><img src="https://static.wixstatic.com/media/d59ada_079a4bde2f0b412bac67432440138728~mv2.png/v1/fill/w_426,h_80,al_c,lg_1,q_85,enc_auto/14_PNG.png" alt=""><figcaption></figcaption></figure>

\
14\. <mark style="color:green;">**Total timer to refill life**</mark> - timer for refill one life. 15 minutes by default. But you can change it like you wish, just change this number:

<figure><img src="https://static.wixstatic.com/media/d59ada_ce8eca88a46848f8b4b3164ac250b4a1~mv2.png/v1/fill/w_426,h_80,al_c,q_85,usm_0.66_1.00_0.01,enc_auto/15_PNG.png" alt=""><figcaption></figcaption></figure>

15. <mark style="color:green;">**Cost of refilling life**</mark> - cost for refill is 12 gems by default, but you can change it. Just change this numbers:

<figure><img src="https://static.wixstatic.com/media/d59ada_f28cbc8f45c9496195ea3d62e24a3ce9~mv2.png/v1/fill/w_221,h_282,al_c,q_85,enc_auto/16_PNG.png" alt=""><figcaption></figcaption></figure>

16. <mark style="color:green;">**Failed settings**</mark> - when a player fails a level, he can give up or buy more moves or time and continue the game. You can change the settings for this menu.

<figure><img src="https://static.wixstatic.com/media/d59ada_acf77d8f3ba74311a1efebde41bfbb50~mv2.png/v1/fill/w_479,h_200,al_c,q_85,enc_auto/17_PNG.png" alt=""><figcaption></figcaption></figure>

17. <mark style="color:green;">**Cost of continue**</mark> - you can change this number of gems for the cost of continue the game:

![18.PNG](https://static.wixstatic.com/media/d59ada_5ec7903c2d7e485997d6d4c1b84fed8a~mv2.png/v1/fill/w_392,h_181,al_c,q_85,enc_auto/18_PNG.png)

18. <mark style="color:green;">**Extra moves**</mark> - number of moves for continue. Just  change this number:

![19.PNG](https://static.wixstatic.com/media/d59ada_e4dd00120ffa469eae84668baef835c7~mv2.png/v1/fill/w_394,h_180,al_c,q_85,enc_auto/19_PNG.png)

19. <mark style="color:green;">**Extra seconds**</mark> - number of seconds for continue. Just  change this number:

![20.PNG](https://static.wixstatic.com/media/d59ada_718fd385f3df4fa7939791f8cc8f1217~mv2.png/v1/fill/w_394,h_180,al_c,q_85,enc_auto/20_PNG.png)

20- 21- 22- 23- 24- <mark style="color:green;">**Target's descriptions**</mark> - when the game starts, appear the banner with target's text. You can change it in this window.

![21.PNG](https://static.wixstatic.com/media/d59ada_79bb950be5d045bba196d63940f2ce84~mv2.png/v1/fill/w_489,h_200,al_c,q_85,enc_auto/21_PNG.png)

## Shop settings

In Shop Setting you can set the price for gems and boosters.

<figure><img src="https://static.wixstatic.com/media/d59ada_e60ecee126014c4b98c03125b7a82230~mv2.png/v1/fill/w_448,h_826,al_c,q_90,enc_auto/22_PNG.png" alt=""><figcaption></figcaption></figure>

1. <mark style="color:green;">**Shop**</mark> - here you can change the price for gems (in dollars) and boosters (in gems).
2. <mark style="color:green;">**Reset to default**</mark> - reset button
3. <mark style="color:green;">**Gems shop settings**</mark> - count and price for gems (in dollars) for each stack.

![23.PNG](https://static.wixstatic.com/media/d59ada_27fa799e0289426ea1ab4f13455a710a~mv2.png/v1/fill/w_240,h_270,al_c,lg_1,q_85,enc_auto/23_PNG.png)

4. <mark style="color:green;">**Gems count**</mark> - here you can change the number of gems and price for this.
5. <mark style="color:green;">**Booster shop settings**</mark> - settings for buying each boosters in game.

![24.PNG](https://static.wixstatic.com/media/d59ada_331a527d3bfd4dc68727f012461ef86e~mv2.png/v1/fill/w_230,h_310,al_c,lg_1,q_85,enc_auto/24_PNG.png)

6. <mark style="color:green;">**Description**</mark> - change it if you need for each boost

![25.PNG](https://static.wixstatic.com/media/d59ada_62f6025169d44c8996aec2b330025554~mv2.png/v1/fill/w_280,h_100,al_c,lg_1,q_85,enc_auto/25_PNG.png)

7. &#x20;<mark style="color:green;">**Count of boosters**</mark> for each stack

![26.PNG](https://static.wixstatic.com/media/d59ada_b706fd3081f84a00a5b7295d0c977d72~mv2.png/v1/fill/w_251,h_170,al_c,q_85,enc_auto/26_PNG.png)

8. <mark style="color:green;">**Price**</mark> (how much gems need for purchase each stack of boost)

![27.PNG](https://static.wixstatic.com/media/d59ada_fcb24374b3c544f1a4ccd84b2df39290~mv2.png/v1/fill/w_251,h_170,al_c,q_85,enc_auto/27_PNG.png)

## GUI editor

Use it for comfortable searching and changing the GUI dialogs. Here you can move any objects. Also for editing fonts and texts.

<figure><img src="https://static.wixstatic.com/media/d59ada_c78181d6497047c89afe421efc96d8e0~mv2.png/v1/fill/w_881,h_268,al_c,lg_1,q_85,enc_auto/28_PNG.png" alt=""><figcaption></figcaption></figure>

* Open GUI Editor
* Click "show" opposite of necessary game menu.&#x20;
* Look on Hierarchy, you will see that this game object was selected.&#x20;
* Expand this game object
* Choose what you want to change.

## Rate Us

It will show on map after passing level.&#x20;

If a player click “Rate” once it will never shows again.

* **Show Rate every** – how often you want to show Rate dialog.&#x20;
* **URL** – path

<figure><img src="https://static.wixstatic.com/media/d59ada_337dfd48636b4720b1d31304b07fd870~mv2.png/v1/fill/w_448,h_180,al_c,lg_1,q_85,enc_auto/30_PNG.png" alt=""><figcaption></figcaption></figure>
